


FLIR C5 Thermal Camera - Cloud Connectivity - Wi-Fi
Description
Description
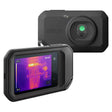
The FLIR C5 Thermal Camera - Cloud Connectivity & Wi-Fi is a combined infrared imager and visible-light inspection camera with an LED torch, FLIR Ignite Cloud connectivity and Wi-Fi. It is ideal for finding hot fuses, air leaks and plumbing issues.
Thermal Imaging
The FLIR C5 Compact Thermal Camera includes a 160 x 120px thermal imager, a 5MP visual-light camera and an MSX® (Multi-Spectral Dynamic Imaging) imaging mode. As a result, the user is able to identify hidden problems easily, quickly and precisely.
The MSX® mode enhances the clarity of the scene by overlaying the digital details, captured using the visual-light camera, onto the thermal image. Also improving the efficiency and precision of the FLIR C5 Compact Thermal Camera is its 1-Touch Level/Span: this function automatically adjusts the level and span of the scene at a single touch. The FLIR C5 Compact Thermal Camera also offers manual and automatic level and span adjustment, allowing the user to tailor the IR imager to his/her preferences.
In addition to the MSX® imaging mode, the FLIR C5 Compact Thermal Camera includes thermal, visual and Picture-in-Picture imaging modes. Furthermore, the user can alter the thermal palette, again, allowing him/her to adapt the FLIR C5 Compact Thermal Camera to his/her preferences and/or the application. The FLIR C5 Compact Thermal Camera features six thermal colour palettes: Iron, Grey, Rainbow, Arctic, Lava and Rainbow HC.
Document and Share Data
Annotations can be added to images to illustrate or explain identified problems, these images can be uploaded to FLIR Ignite using the FLIR C5 Compact Thermal Camera Cloud connectivity and Wi-Fi. FLIR Ignite can be used to store, organise and backup thermal, visual and MSX images, and allows the user to access these images on a variety of devices such as a smartphone or tablet.
Alternatively, images can be shared with colleagues and/or clients using a password-protected link sent via email. This enables users to identify and communicate potential issues quickly, facilitating faster collaborative decisions, and increasing job efficiency.
In addition to this, the FLIR C5 Compact Thermal Camera is compatible with reporting software, such as FLIR Thermal Studio, allowing the user to create professional reports including captured thermal, visual and MSX images.
Portable, Practical and Durable
The FLIR C5 Compact Thermal Camera is compact: it has been designed to fit into a pocket or tool bag. This ergonomic thermal imaging camera offers a high level of protection against dust and water ingress (IP54). It is also able to withstand a 2m (6.6ft) drop.
Furthermore, to enable visual inspection of dark and/or difficult-to-reach areas, the FLIR C5 Compact Thermal Camera includes a built-in LED torch. The FLIR C5 Compact Thermal Camera also includes an integrated 3.5-inch touchscreen display.
The FLIR C5 Compact Thermal Camera with Cloud Connectivity & Wi-Fi is an ergonomic and easy-to-use infrared and visual-light imaging camera. It can be used to conduct quick inspections, document findings and share evidence with clients and/or colleagues. The FLIR C5 Compact Thermal Camera with Cloud Connectivity & Wi-Fi is ideal for building inspections, facilities maintenance, electrical repairs, troubleshooting and HVAC/R applications.
FLIR C5 Compact Thermal Camera with Cloud Connectivity & Wi-Fi Key Features
- Infrared and visual-light inspection camera
- LED torch
- FLIR Ignite Cloud connectivity and Wi-Fi
- Ideal for finding hot fuses, air leaks and plumbing issues
- 160 x 120px thermal imager
- 5MP visual camera
- Identify hidden problems easily, quickly and precisely
- MSX® imaging mode: digital details are overlaid onto the thermal image to enhance the clarity of the scene
- Thermal imaging mode
- Visual imaging mode
- Picture-in-Picture imaging mode
- 1-Touch Level/ Span: automatically adjusts the level and span of the area-of-interest at a single touch
- Automatic level and span adjustment
- Manual level and span adjustment
- Selectable thermal colour palettes: Iron, Grey, Rainbow, Arctic, Lava and Rainbow HC
- Annotations can be added to images
- Upload images to FLIR Ignite using Cloud connectivity and Wi-Fi
- Images uploaded to FLIR Ignite can be accessed from a variety of devices such as smartphones and tablets
- Store, organise and back-up images using FLIR Ignite
- Share images using a password-protected link sent via email
- Compatible with reporting software such as FLIR Thermal Studio
- Compact: designed to fit in a pocket or tool bag
- IP54
- Can withstand a 2m/ 6.6ft drop
- Built-in LED torch
- Integrated 3.5” touchscreen display
- Compact, convenient, comprehensive IR and visual-light imaging camera
- Conduct quick inspections, document findings and share evidence with clients
- Ideal for building inspections, facilities maintenance, electrical repairs, troubleshooting and HVAC/R applications
Reviews
Reviews
Payment & Security
Payment methods
Your payment information is processed securely. We do not store credit card details nor have access to your credit card information.
Not sure where to start? Let us help!
Answer a few questions and we’ll get you on your way


