Description
Description
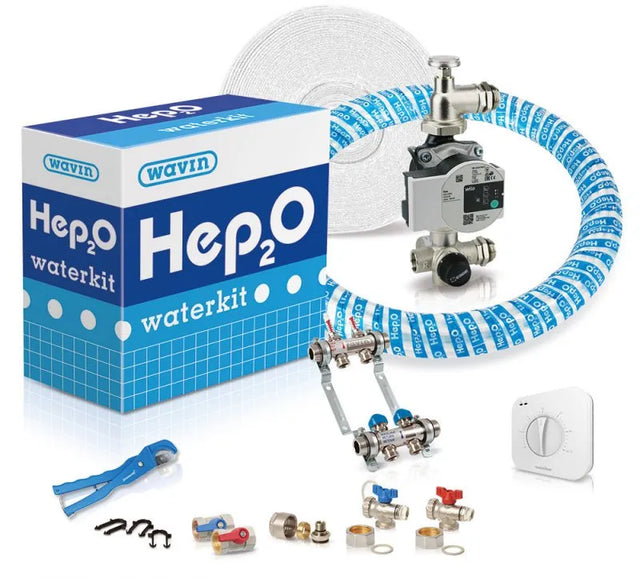
The Wavin Hep2O Water Underfloor Heating Standard Output Kit stands out as a premium choice for both homeowners and professional installers, celebrated for its reliability, ease of installation, and exceptional performance. This professional-grade system offers a sophisticated solution for modern underfloor heating needs, ensuring a consistent and comfortable environment throughout your space.
The Hep2O Standard Output Underfloor Heating Kit is meticulously designed for use in well-insulated single-room extensions. This system excels in delivering even heat distribution and optimal performance, making it perfect for enhancing the warmth and comfort of individual rooms. The installation process is straightforward and efficient: simply secure the pipes to insulation at 250mm centers using the included pipe fixing staples, then cover with a layer of screed. This method ensures a robust and effective heating setup with minimal fuss.
Key Features:
- Professional Quality: Renowned for its reliability and user-friendly design, making it a top choice among homeowners and installers alike.
- Efficient Design: Tailored for single-room extensions with high insulation, providing effective and even heat distribution for enhanced comfort.
- Easy Installation: The system features a straightforward installation process. Pipes are easily fixed to insulation at 250mm centers with pipe fixing staples, followed by a screed layer, streamlining the setup process.
- Versatile Application: Suitable for various underfloor heating projects, offering flexibility to accommodate different room sizes and heating requirements.
- Enhanced Comfort: Ensures a consistent and comfortable heat output, making it an ideal solution for adding warmth to newly extended or renovated spaces.
Elevate your underfloor heating experience with the Wavin Hep2O Water Underfloor Heating Standard Output Kit. Its combination of professional quality, efficient design, and ease of installation makes it a reliable and effective choice for achieving superior warmth and comfort in your home.
*Please note the contents of the kit may vary from listed imagery
Reviews
Reviews
Specifications
Specifications
Specifications
High-Quality Construction
ProWarm Electric Underfloor Heating Sticky Mat: Utilizes the same premium cable as the ProWarm Loose Cable kit. The mat incorporates a sticky fibreglass mesh to ensure optimal heat output by maintaining proper cable spacing. Installation is straightforward—simply roll out the mat to cover the desired heating area.
Heating Cable: Series-type with twin conductors and a 4m cold lead at one end.
Cable Composition: The resistance heating wire is encased in a fluoropolymer insulation layer, wrapped in protective metal shielding, and enclosed in a final plastic outer sheath. The twin conductor cable has a final diameter of 2mm.
Junction Design: Unique design for hot and cold lead junctions ensures they are 100% foolproof.
Standards and Approvals
Standards: Meets all test requirements of IEC 60335.
Certifications: CE certified by SGS.
Performance and Benefits
Cost-Effective: Provides heat precisely where needed, optimizing heat utilization and minimizing losses.
Flexibility: Can be installed in any area or floor layout.
Comfort: Close and uniform spacing of heating cables, combined with thermostat controls, allows for precise temperature settings, enhancing comfort.
DIY-Friendly: Designed for easy installation with clear instruction manuals and professional technical support.
Versatility: Available in various heat loads and sizes to suit various flooring types.
Mat Dimensions
Width: 0.5m
Length: Dependent on the selected square meter coverage
Cable thickness: 2mm
Kit Contents
Kit Contents
Kit Includes:
- Underfloor Heating Sticky Mat (Two individual mats if kit size over 12m2)
- Floor Primer - a high-performance universal priming/sealing agent suitable for plaster, timber, brick, and block work.
- Roller - a high-quality roller for applying floor primer to the subfloor
- Adhesive tape - works to assist in holding a mat or cable in position during installation
- 2m Floor Sensor Probe Conduit - provides a protective pathway for the sensor probe, connecting to your thermostat
- Digital thermostat (if selected) - adjust the heat settings and enjoy warm floors through a simple touch of a button
Installation
Installation
Installation
Please Note: This is a brief guide. Always refer to the full installation manual for comprehensive instructions.
1. Plan Your Layout:
- Divide the floor into a series of rectangles. Use these measurements to calculate the number and sizes of mats needed, excluding permanent or static fixtures from your calculations.
2. Prepare the Subfloor:
- For screed over concrete floors, lay insulation boards to minimize heat loss and ensure quicker warm-up times.
3. Lay the Heating Mat:
- Start with the first run of the mat. Cut the mat (leaving the cable intact) at the end of each run, turn it 90° or 180°, and continue laying.
- Once the area is covered, adjust the mat so that the loops are evenly spaced.
- Secure the mat to the subfloor using the special tape provided.
4. Electrical Connections:
- Install an RCD fused spur to power the thermostatic controller/programmer and the mat system.
- Lay the temperature probe from the timer-thermostat onto the floor, position it equidistant between two cable loops, and secure it to the surface.
- Position the unheated power supply cable from the end of the mat system near the thermostat.
- Make all necessary connections to the power supply. Run the heaters for no more than 10 minutes to ensure they are heating up properly.
5. Finish the Flooring:
- Option 1: Apply a thin, self-levelling screed over the mat and allow it to dry completely before laying tiles.
- Option 2: Directly trowel flexible tile adhesive over the mat and lay the floor tiles.
- After grouting, let the tile adhesive cure fully before switching on the system.
Payment & Security
Payment methods
Your payment information is processed securely. We do not store credit card details nor have access to your credit card information.
Not sure where to start? Let us help!
Answer a few questions and we’ll get you on your way


