


Warmup Inscreed Underfloor Heating System
Description
Description
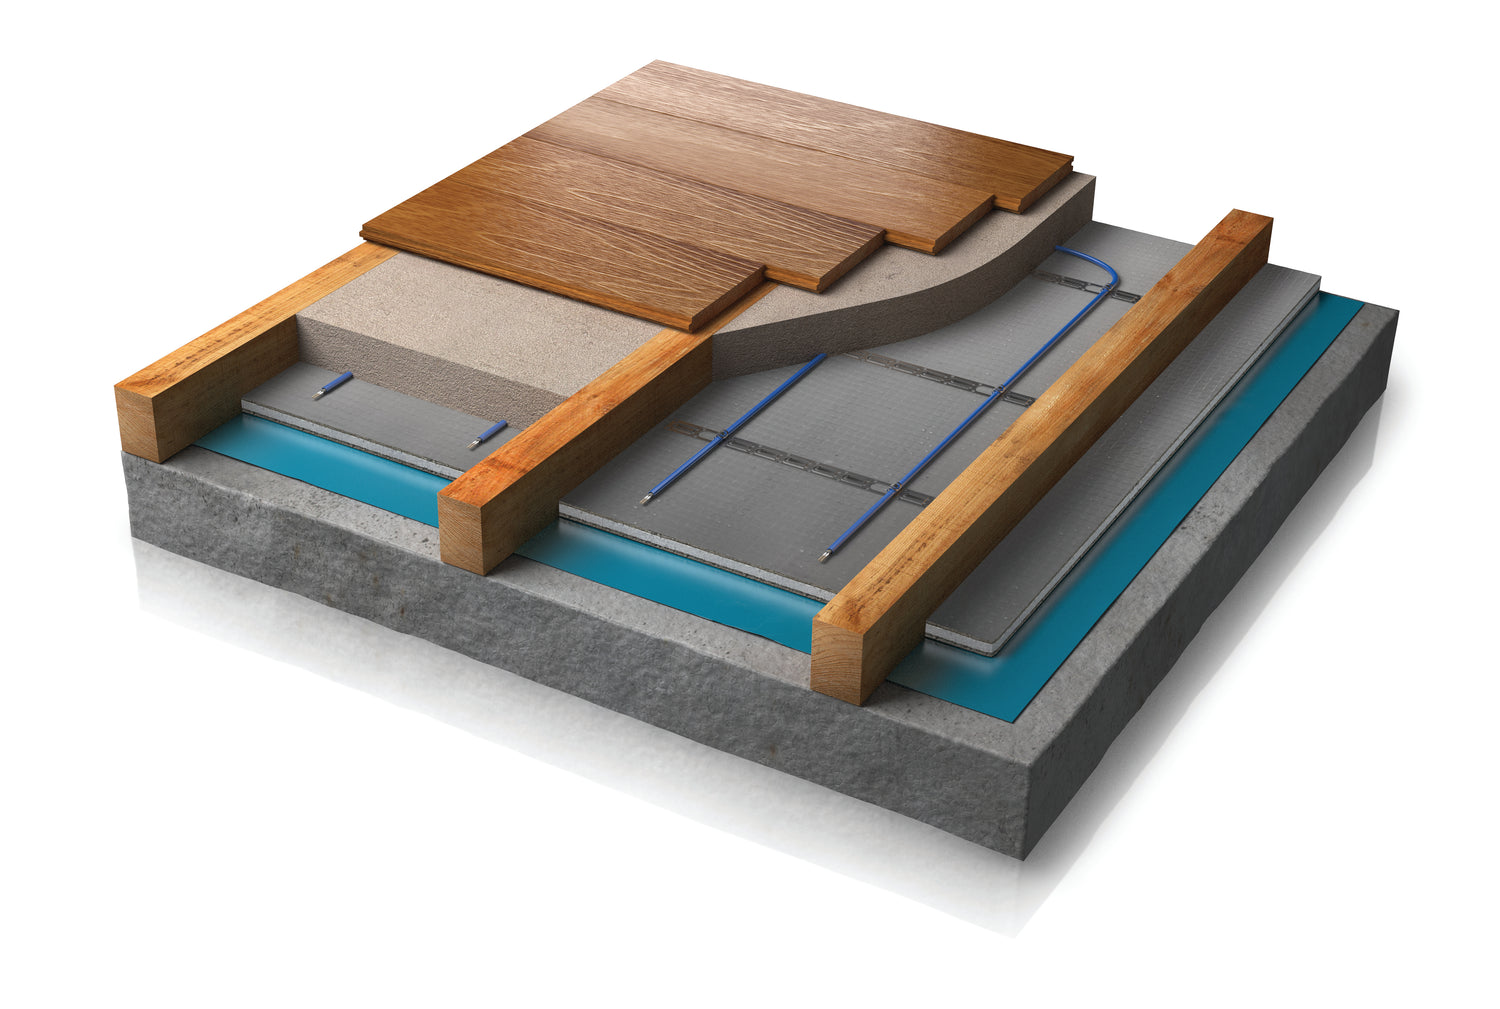
The Warmup Inscreed Underfloor Heating System is the perfect solution for underfloor heating in concrete floors. Specifically designed for new builds with concrete floor constructions, the Inscreed Cable System offers efficient and reliable heating performance.
The Inscreed Cable electric underfloor heating system is ideal for installation in concrete screed thickness ranging from 50mm to 100mm. To ensure optimal heat-up times, it is recommended to use insulation boards if insulation is absent or if the concrete subfloor is more than 100mm thick. Instarmac's UltraFloor range offers excellent screeds that work seamlessly with the Inscreed Cable system.
The Inscreed Heater is suitable for almost any flooring finish, making it a versatile choice. Whether you prefer wood, carpet, vinyl, or even plan to change the flooring from time to time, the Inscreed Cable system ensures consistent and comfortable heating.
Suitable Floor Coverings for Inscreed Cable
The Inscreed Cable system is compatible with various floor coverings, allowing you to choose the option that best suits your preferences:
- Tiles: When laying a tiled floor, it is essential to use flexible tile adhesive and grout with the Inscreed Cable electric underfloor heating system.
- Laminate/Wood: For laminate or engineered wooden board floors, ensure the flooring is no more than 18mm thick to allow proper heat transfer. If using insulation beneath the flooring, ensure it is compatible with underfloor heating installation.
- Concrete: Concrete floors provide quick heat-up times and excellent heat retention. A heated polished concrete floor is an excellent choice to enhance the comfort and warmth of your home.
Installation of Inscreed Cable Underfloor Heating on Concrete Floors
Prior to installation, carefully read the installation manual provided. If the concrete base is thicker than 100mm or the subfloor is uninsulated, it is recommended to apply insulation boards and lay the wire directly on the insulation. For concrete bases less than 100mm thick or insulated, the wire can be laid directly on the concrete slab. However, insulation directly below the heating cable improves system efficiency.
Before beginning the installation, ensure the subfloor is suitable for screeding, rigid, and free of dust and debris.
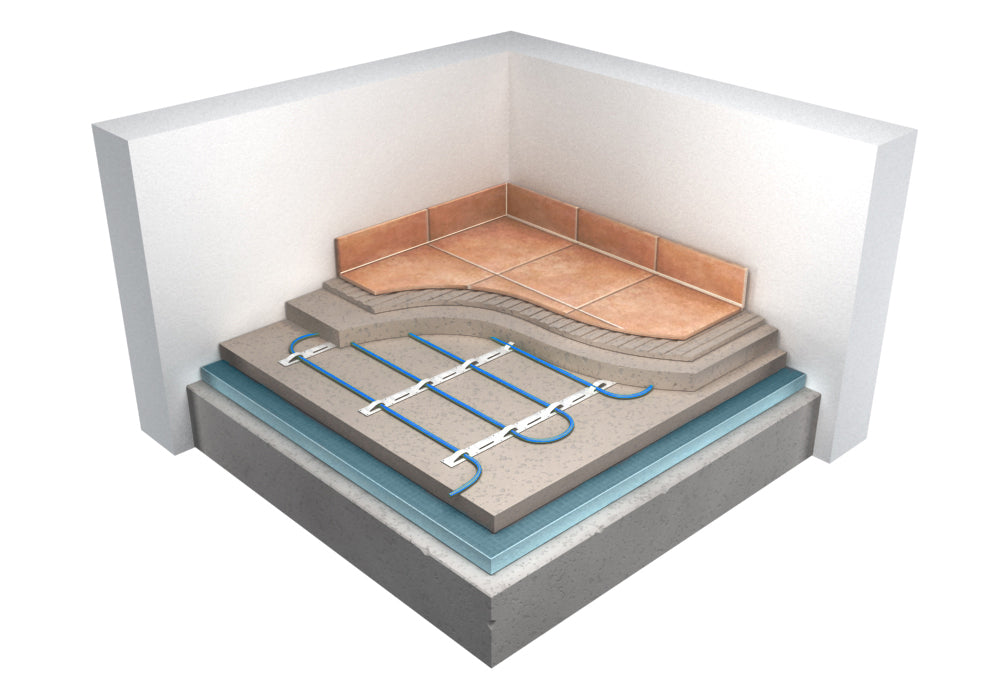
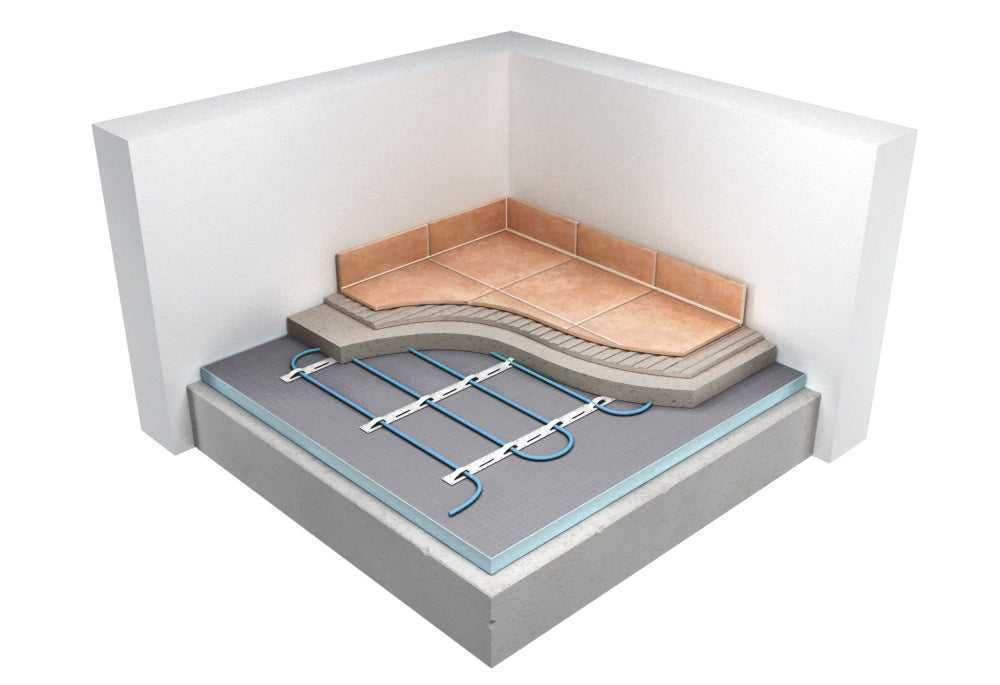
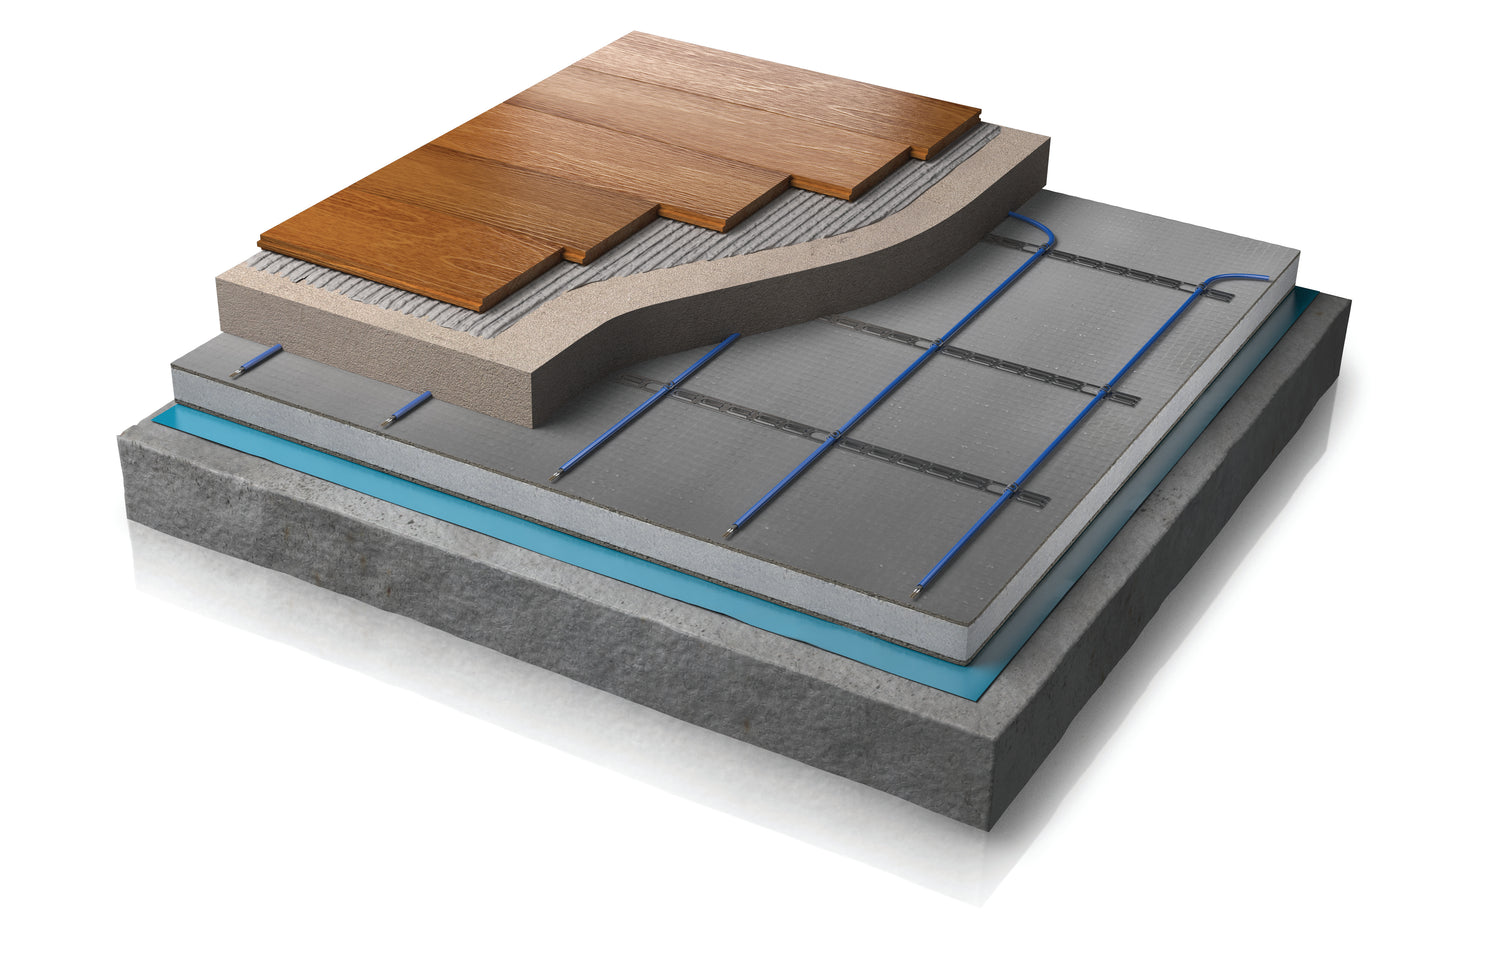
The Inscreed Cable should be laid at least 50mm apart and a minimum of 50mm deep within the screed. Metal fixing strips are used to secure the Inscreed cable to the subfloor. These strips are laid out perpendicular to the heating element and fixed to the insulation board or concrete floor using fixing nails or adhesive, ensuring stability. The heating cable is then laid in a zigzag pattern and clipped into the metal fixing strips, evenly spacing the cable for an even distribution of heat.
Once the cable is in place, the next step is to screed over the heating system by carefully pouring cementitious screed over the fixed Inscreed Cable to a depth of at least 50mm. Place the floor probe supplied with the thermostat as close to the final floor finish as possible, embedding it in the screed. Complete the installation by wiring the heating cable to a thermostat.
After the screed or leveling compound has fully dried, you can proceed to lay the final floor covering of your choice.
Features and benefits
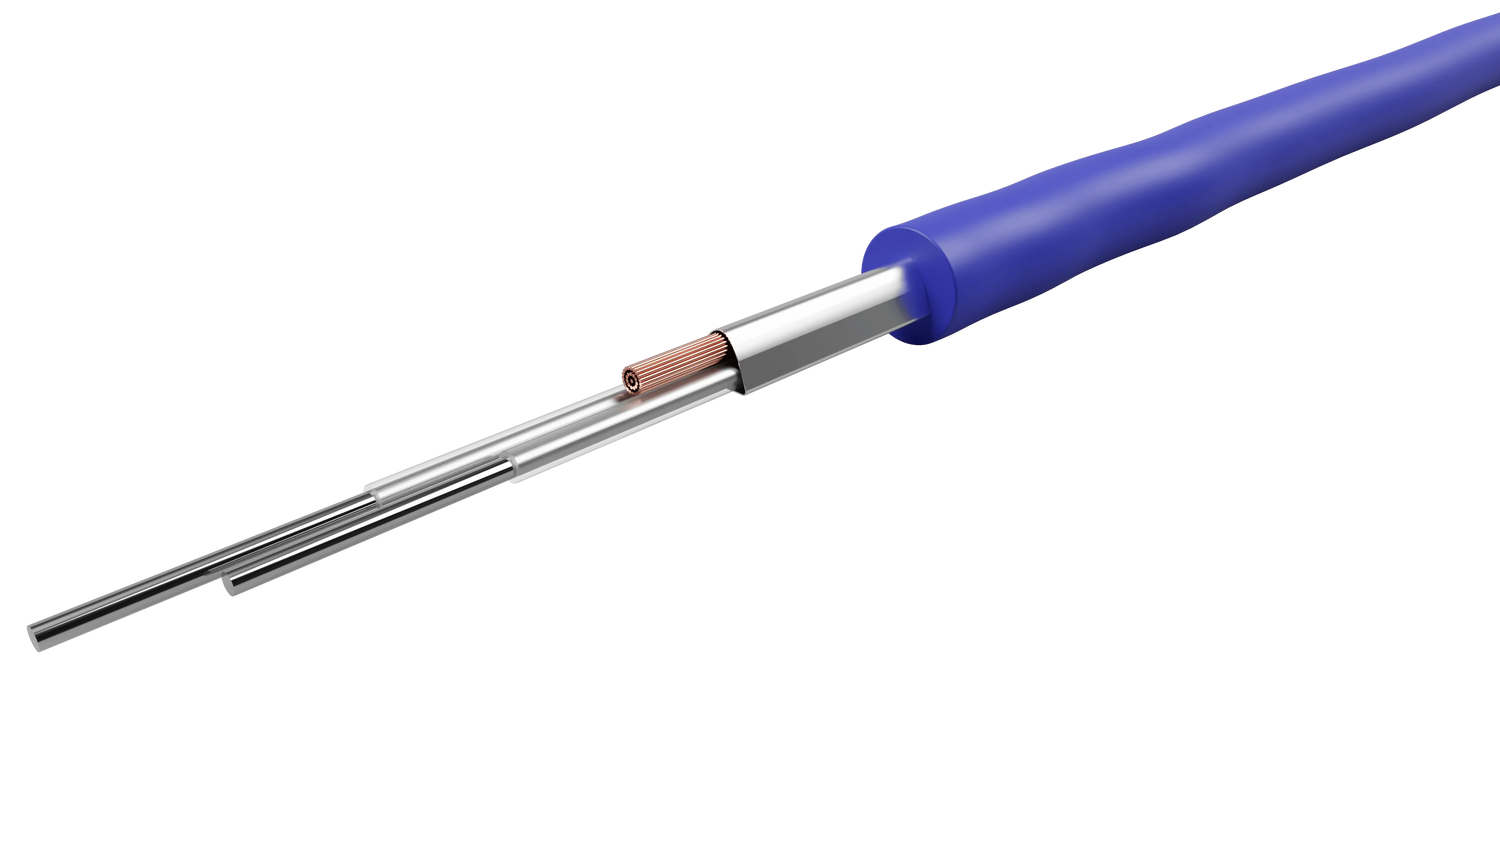
- Tough - 6mm thick heating cable is protected by multiple layers of metal shielding and insulation
- Grounding braid makes it safe for wet rooms
- Versatile - compatible with all floor finishes
- Suitable for new build
- Floor covering can be changed without risk of damage to the heater.
- Approvals: SEMKO, FIMKO
- 10-year Warranty
Specifications
| Operating voltage | 230V; 50Hz |
|---|---|
| Output rating | 100 to 210W/m2 |
| Connection lead | 2.5m long |
| cable diameter | 6mm |
| Standards | Meets all test requirements of IEC 60800 |
Installation
Always refer to the installation manual for full instructions.
- The Warmup Inscreed Heating Cable is designed to be placed within a cementitious screed of at least 50mm in thickness, with at least 30mm of this screed above the heating wire. If the Warmup Insulation board is being used directly under the heater please ensure the heater is covered with a minimum of 50mm screed to adhere to minimum screed requirements. It is advised that a floor plan is drawn up to determine the placement of the thermostat, heating cable and the sensor probe. This diagram should be kept for future reference.
- The fixing strips should be laid out perpendicular to the heating cable runs. These fixing strips must be secured to the insulation or the concrete floor using fixing nails or an adhesive. It is important to ensure there is no movement of the fixings.
- The fixing strips should be evenly spread across the floor at intervals of 0.75m. The fixing strips should be placed so as to leave a minimum of 100mm border all the way around the room.
- Examine the cable and test the resistance BEFORE and AFTER installation.
- The heating cable should then be laid up and down the room and clipped into the fixing strip. The cable spacing is determined by the product model. The cables should be spaced evenly at all times to ensure an evenly heated floor (minimum spacing is 50mm). The cables should never touch or cross each other.
- The heating cable cold tail should be connected to the thermostat by a qualified and Part P certified electrician. The heating cables should then be tested again BEFORE screeding. Record the readings in the NOTES Section. Once laid, the heating cables must be covered with a minimum thickness of 30mm of screed. If the Warmup Insulation board is being used directly under the heater please ensure the heater is covered with a minimum of 50mm screed to adhere to minimum screed requirements.
Reviews
Reviews
Payment & Security
Payment methods
Your payment information is processed securely. We do not store credit card details nor have access to your credit card information.
Not sure where to start? Let us help!
Answer a few questions and we’ll get you on your way